Changing Strings
Strings are important
It’s amazing how much the sound of an ukulele is affected by the strings. Quite often, cheap ukuleles can be hugely improved just by putting good strings on. Factory strings on cheap ukuleles are sometimes really miserable. They sound dull and ugly, and the intonation is terrible — an ukulele can sound crooked just because the strings are poor. With new, high-quality strings, the same ukulele becomes a much better instrument.
Finding out which strings are best suited for an ukulele requires some trial and error. Don’t save on the strings — it absolutely makes sense to check out a few different (high-quality) string types on a good ukulele.
I made a string comparison video here quite a while ago. In the meantime, many new string types became available, however it still demonstrates how big of a difference the strings can make on the same ukulele.
Durability of strings
On a soprano ukue with re-entrant tuning the string tension is usually far below the breaking point of the strings. Broken strings will be a rare sight. However, it’s very dependent on the playing style how quickly strings tend to wear out. For some players, the strings last for many years, while other players have to change strings every few months or even weeks. Strings should be changed as soon fatigue becomes noticeable. For example, the strings can develop some roughness where they are usually strummed, or little notches at the fret positions. It can also happen that the intonation of a string begins to suffer.
Best practices for changing strings
First remove the old strings. You may want to use the opportunity to clean the fretboard and the body area below the strings. When putting on new strings, make sure that you attach them correctly to the bridge and the tuning pegs, depending on the construction this works a bit differently. Mind that every string is intended for a specific scale and tuning. Not paying attention to this may lead to poor sound or even damage your instrument. Each of the four strings of a set is designed for a specific tone, so it does matter not to mix them up. Every string should be put on the right place.
If the ukulele has friction tuners, loosen the screws a bit before changing strings (but don’t loosen them entirely), so you can turn the pegs effortlessly. After changing strings re-tighten the screws a bit to make sure the pegs will reliably hold the strings in tune, but make sure they still can be operated by hand for re-tuning.
Attaching the strings to the bridge
Every string should first be attached to the bridge, then to the tuning peg. There are several different bridge types:
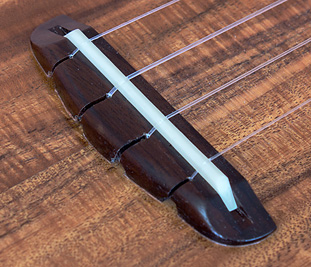
Slotted bridge
For this bridge design, first tie a figure 8 knot at the end of a string. Then shove the the end of the string with that knot into that little hole below its slot, so that the string is lead through that slot.
The disadvantage of this bridge design is that very thick or very thin strings can lead to problems, if they don’t fit their respective slot width well enough. If a string is too thick, it may not fit into its respective slot. In this case you’ll have to widen the slot (for example with fine sandpaper). If it is too thin, the knot may slip through the slot. In this case you may have to use multiple knots.
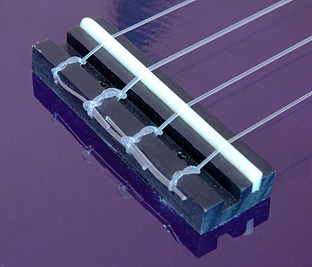
Tie bridge
The tie bridge works just like a small version of a classical guitar bridge. Like on the classical guitar, a timber hitch is used for attaching a string. There are many tutorials available for changing strings on a classical guitar, which show exactly how it works for this bridge type. It’s a best practice to lead the ends of the string (cut to an appropriate length) below the knots of the neighbour strings, as shown on the illustration. This is done to prevent that the strings can touch the sound board, since this might lead to buzzing. However, I have to admit that I’m too lazy for doing this sometimes, usually it’s no problem on a soprano ukulele…
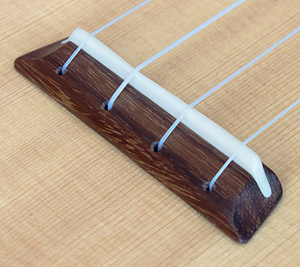
“String-thru”-bridge
The advantage of this elegant bridge type is that it can be very small and light, thus allowing for a more efficient transmission of the string oscillations to the sound board. To my knowledge, only few high quality instruments built with this bridge type.
The disadvantage lies in the unused handling. The strings have to be led far through their respective hole, so that the end can be pulled out of the sound hole. In order to achieve this, turn the string while leading it through the hole and watch if it becomes visible in the sound hole, then try to pull it out with your fingers. It’s less complicated than you may think. Tie a figure 8 knot into the end you pulled out of the sound hole. Now pull the string back so that it is held by the figure 8 knot below the sound board under the bridge. Just make sure that knot can’t slip through the respective hole.
Attaching the strings to the tuning pegs
After attaching a string to the bridge, you attach it to its respective tuning peg and tune it up: Lead it through the hole in its respective tuning peg, gently pull so it goes straight over the fretboard and through its respective nut slit, and lead it again through the hole in the tuning peg (so it goes through the tuning peg hole two times). Now tune it up by turning the knob of the tuning peg. The tuning pegs on the right side must turn right, the pegs on the left side must turn left. The strings should be coiled downwards, to make sure they sit well in their nut slits. When tuning up, roughly tune them right to their intended tuning tone. Right now they won’t hold their tuning (it will quickly drop), don’t worry about this. After putting on all strings, cut them to length, so the string ends won’t interfere when playing or tuning the ukulele.
Directly after putting on the strings, they won’t be able to hold their tuning, since they need to settle in and get used to the tension. It will get better in time, just keep re-tuning. To speed this up a bit, I like to tune them one or two half tones too high for a short period. Just don’t overdo it, tuning significantly too high will damage your instrument. To prevent damaging a precious instrument, I only tune a single string slightly higher at a time.
Of course you’re using this information at your own risk. It may happen that an instrument gets damaged when changing strings, and I certainly can’t be held responsible for this. However this never happened for me, and I have many ukuleles and changed strings this way very often already.


 English
  Deutsch